
Pathway lighting serves as an essential component in enhancing the aesthetic appeal and functionality of outdoor spaces, transforming garden paths, driveways, and walkways into inviting, safe, and enchanting routes after dusk. Whether for a home garden, a commercial landscape, or a cozy backyard, innovative pathway lighting ideas can dramatically elevate outdoor experiences, blending both form and function. In this article, we explore a variety of creative lighting techniques and designs that not only illuminate paths with elegance but also complement the surrounding environment, offering inspiration for anyone looking to add a touch of brilliance to their outdoor settings.
Solar-Powered Path Lights
Incorporating solar-powered path lights is an eco-friendly and cost-effective way to illuminate your outdoor pathways. These lights collect solar energy during the day and automatically turn on at dusk, providing gentle and inviting lighting without the need for complex wiring. Their versatility allows them to be placed anywhere the sun reaches, making them ideal for garden walkways, driveways, or around patios.
How to Achieve It
Placement:
– Identify sunny spots along your pathway where the solar panels can receive maximum sunlight.
– Space the lights evenly to maintain uniform lighting and avoid dark spots.
Selection:
– Choose lights that complement your outdoor d??cor. Options range from sleek, modern designs to classic lantern styles.
– Ensure the lights have a sufficient lumen output for the desired brightness and check for weather-resistant features.
Installation:
– Assemble the lights according to the manufacturer’s instructions.
– Insert each light into the ground, ensuring they are stable and secure.
– Allow the solar panels to charge for a full day before first use.
Color Scheme:
– Opt for warm white lights to create a cozy and welcoming atmosphere.
– For a modern touch, cool white or blue-tinted lights can add a contemporary vibe.

LED Strip Lighting
Installing LED strip lighting along your pathways provides a sleek and modern look, enhancing safety and aesthetics. These flexible, low-voltage lighting options can be installed directly onto pathway edges, providing continuous illumination. LED strip lights are energy-efficient, and long-lasting, and come in various colors, allowing for both subtle and vibrant lighting effects.
How to Achieve It
Preparation:
– Measure the length of your pathway to determine how much LED strip lighting you need.
– Decide on the placement: either along the edge of the pathway or beneath railings for an indirect glow.
Selection:
– Choose waterproof LED strip lights suitable for outdoor use.
– Opt for a strip with adjustable brightness and color settings to customize the lighting to your preference.
Installation:
– Clean the surface where the LED strips will be adhered to ensure maximum adhesion.
– Secure the LED strips using the adhesive backing, clips, or brackets as per the manufacturer’s instructions.
– Connect the strips to a power source, such as a nearby outdoor outlet or a solar panel if they’re compatible.
Color Scheme:
– Use warm white for a cozy and inviting pathway.
– Select multicolor LEDs for a playful and dynamic look that can change with seasons or events.

Lantern-Style Bollard Lights
Lantern-style bollard lights offer a classic and elegant solution for pathway illumination, seamlessly blending aesthetics with practicality. These lights provide a soft, ambient glow, creating a charming atmosphere reminiscent of old-world lanterns while ensuring safety along walkways. Available in a variety of designs, materials, and finishes, they can enhance any landscaping style and serve as decorative features during daytime.
How to Achieve It
Preparation:
– Measure the length of your pathway and determine the number of lights needed based on the space between each light.
– Consider the style and finish that will best complement your existing outdoor d??cor.
Selection:
– Choose bollard lights with durable materials, such as metal or weather-resistant polymers, to withstand outdoor conditions.
– Select lights compatible with LED bulbs for energy efficiency and longevity.
Installation:
– Plan the layout to ensure even spacing and coverage along the pathway.
– Dig shallow holes for the bollard bases and secure them using concrete or bolted plates for stability.
– Connect the lights to a power source, ensuring wiring is safe and protected from outdoor elements.
Color Scheme:
– Opt for warm lighting to evoke a cozy and inviting atmosphere.
– Neutral finishes like black, bronze, or stainless steel are versatile choices that can match various garden styles.

“`
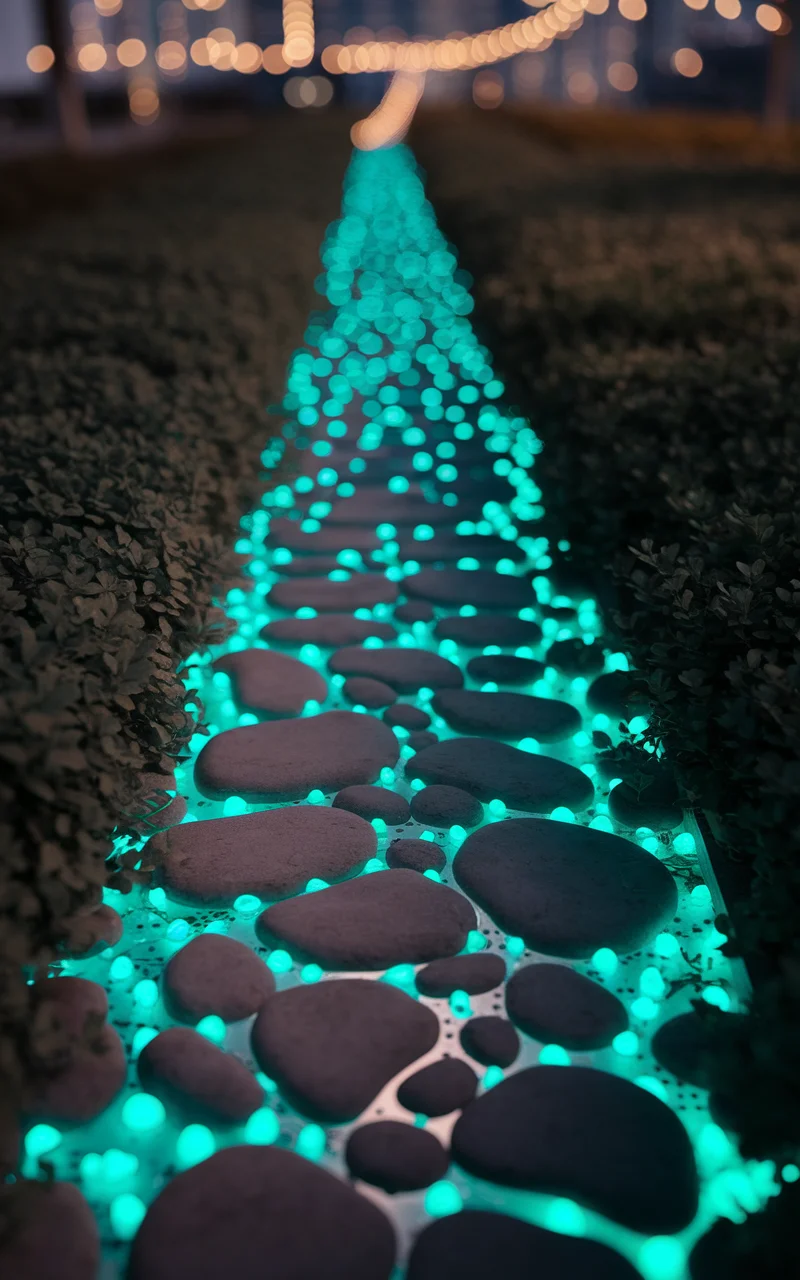
Glow-in-the-Dark Pebbles
Glow-in-the-dark pebbles create a magical nighttime ambiance without the need for electricity by absorbing sunlight during the day and emitting a soft glow in the dark. Scattering these pebbles along your pathway adds an enchanting, whimsical touch that also guides your way. Ideal for garden paths, driveways, or around water features, they offer a low-maintenance lighting solution with significant visual impact.
How to Achieve It
Preparation:
– Calculate the approximate area you want to cover with the glow-in-the-dark pebbles to determine how many you’ll need.
– Plan the design, deciding whether you want a solid border, scattered look, or artistic pattern along the pathway.
Selection:
– Choose pebbles made from high-quality photoluminescent materials for a stronger and longer-lasting glow.
– Ensure pebbles are weather-resistant to maintain durability in outdoor settings.
Installation:
– Clear the pathway of debris and level it to provide a smooth surface for placing the pebbles.
– Distribute the pebbles according to your design; you can integrate them between paving stones or as a standalone feature.
– For a more permanent setup, consider embedding them in a clear epoxy to fix their position.
Color Scheme:
– Select natural stone colors during the day; they typically emit a teal, blue, or green glow at night, creating a mystical effect.
– Consider mixing shades for a more dynamic and playful appearance.
“`
“`
Recessed Ground Lights
Recessed ground lights are a sleek and modern solution for illuminating pathways. These lights are installed flush with the ground, offering subtle yet effective lighting without disrupting the landscape. Ideal for contemporary settings, recessed ground lights provide a clean and unobtrusive option that ensures safety while enhancing the aesthetics of garden paths or driveways.
How to Achieve It
Planning:
– Assess your pathway to decide where the lights will have the most impact, such as at key entry points or along curves.
– Measure the area to determine the number of lights needed for adequate coverage.
Selection:
– Choose IP-rated waterproof lights specifically designed for outdoor use.
– Opt for lights with stainless steel or aluminum casings for durability and resistance to outdoor elements.
Installation:
– Mark the spots for installation and ensure they won’t interfere with any underground utilities.
– Prepare recess holes according to the light fixture size and install the lights flush with the surface.
– Connect the lights to an outdoor-rated power source, following safety guidelines for any electrical work.
Color Scheme:
– Use warm white lights for a welcoming atmosphere that highlights garden features.
– Cool white lights can create a modern, crisp look that’s ideal for contemporary landscapes.
“`

“`
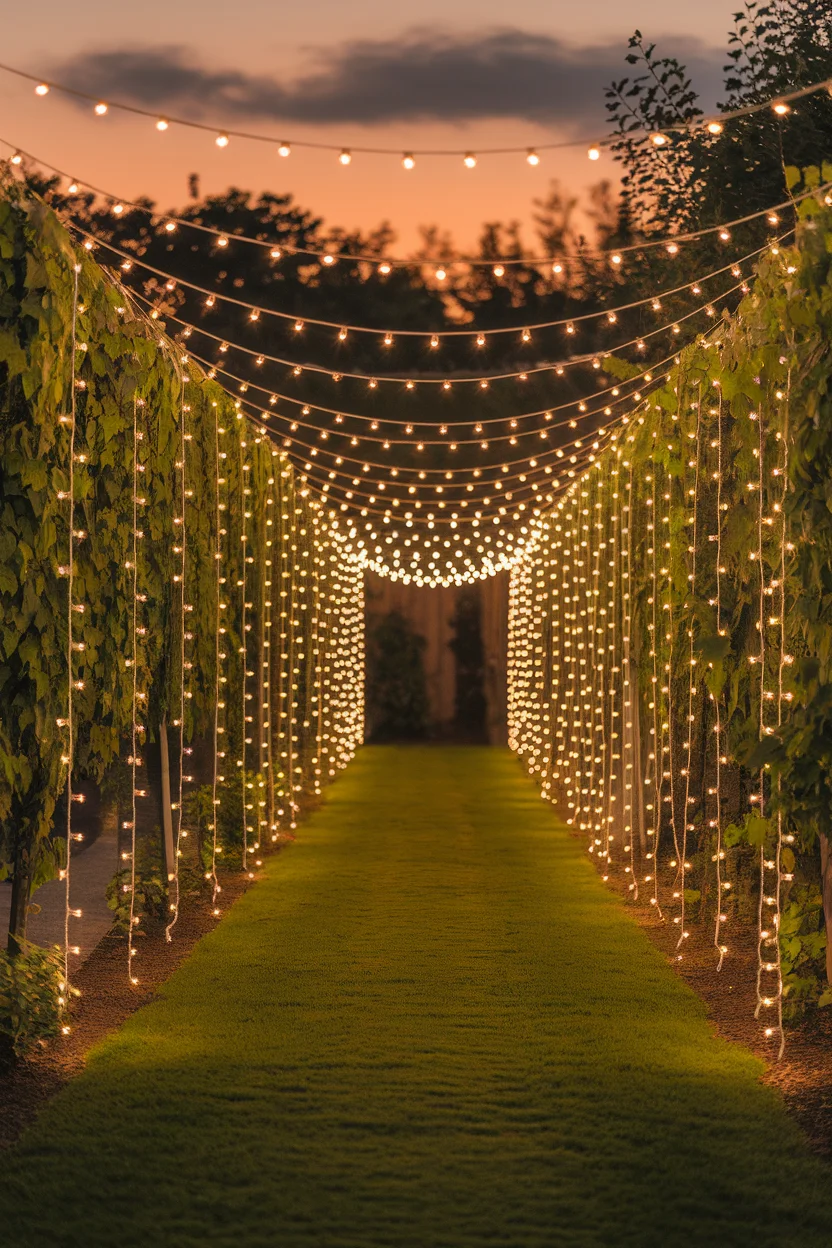
String Lights Overhead
String lights overhead offer a charming and atmospheric method to light up your pathways. By hanging these lights across or above your path, you create a canopy of twinkling lights that provide both functional illumination and visual appeal. This approach works perfectly for garden paths, outdoor parties, or special events, lending a magical vibe to your space.
How to Achieve It
Preparation:
– Measure the length and width of your pathway to determine the amount of string lights needed.
– Decide on a pattern for hanging, such as zigzag, parallel lines, or crisscross.
Selection:
– Choose weatherproof string lights designed for outdoor use.
– Opt for LED bulbs for energy efficiency and durability.
Installation:
– Install sturdy hooks or poles along the pathway to support the string lights.
– Secure the lights tightly to prevent sagging, ensuring they are evenly spaced.
– Connect the lights to a safe power source, using outdoor extension cords if necessary.
Color Scheme:
– Use warm white bulbs for a cozy and inviting ambiance.
– For a festive atmosphere, consider colored lights or those that have twinkle or dimming features.
“`
“`
Motion Sensor Path Lights
Motion sensor path lights are an innovative and energy-saving option for pathway illumination. These lights activate only when they detect movement, providing bright visibility to guide your way and enhancing security around your home. Ideal for driveways, garden paths, and entrances, these lights ensure pathways are illuminated only when needed, reducing energy consumption while maintaining their functional purpose.
How to Achieve It
Assessment:
– Identify areas along pathways where motion detection would be most beneficial, such as entry points or dark corners.
Selection:
– Choose weatherproof motion sensor lights designed specifically for outdoor installations.
– Opt for LED options for energy efficiency and longer lifespan.
Installation:
– Follow manufacturer guidelines to set the sensor range and sensitivity for optimal performance.
– Securely mount the lights at heights where they can effectively detect movement without obstructions.
– Connect lights to an appropriate power source, ensuring that wiring is safely installed and protected from weather elements.
Color Scheme:
– Use warm white light to create a welcoming ambiance.
– Select a setting that allows for adjustable brightness to suit mood and security needs.
“`

“`
Embedded Stone Lighting
Embedded stone lighting integrates LED lights directly into pathway stones, blending them seamlessly into your outdoor space. This method offers a streamlined look, adding subtle illumination that enhances the natural beauty of your pathway while ensuring safe navigation. Ideal for garden paths and driveways, these lights provide a durable and weather-resistant solution that complements any landscape design.
How to Achieve It
Planning:
– Assess your pathway and decide on the layout and spacing for optimal illumination.
– Determine the number of embedded lights needed based on the size and length of your pathway.
Selection:
– Choose LED stone lights that are weatherproof and suitable for outdoor use.
– Select designs that match or complement your existing stonework for a cohesive look.
Installation:
– Mark the spots where lights will be embedded into the pathway stones.
– Drill or cut spaces in stones to fit the lights securely, ensuring a flush installation.
– Connect the lights to a power source, using waterproof wiring to withstand outdoor conditions.
Color Scheme:
– Opt for soft white or warm white lighting to create a natural and soothing atmosphere.
– Consider adjustable color options for added versatility and mood setting.
“`

“`
Moonlighting Technique
The moonlighting technique uses strategically placed lights high up in trees to mimic the natural light of the moon. This creates a soft and dappled illumination on pathways, invoking a serene and ethereal ambiance. Ideal for garden paths shaded by trees, this method not only enhances the beauty of your landscape but also maintains a natural feel, making nighttime strolls both safe and magical.
How to Achieve It
Preparation:
– Identify trees that provide optimal height and coverage along your pathway.
– Determine the number of lights needed based on the size of the area and the desired level of illumination.
Selection:
– Choose LED fixtures with a narrow beam spread to create focused, downward lighting.
– Ensure the lights are rated for outdoor use and have weather-resistant casings.
Installation:
– Secure the lights high up in the trees using durable mounting hardware, aiming them downward.
– Conceal the wiring along the tree trunks, ensuring it is protected from weather elements.
– Connect the lights to a power source, considering solar options if access to electricity is limited.
Color Scheme:
– Opt for soft or cool white lighting to replicate the natural glow of the moon.
– Avoid overly bright lights to maintain a subtle and natural appearance.
“`

“`
Masonry Pathway Tiki Torches
Masonry pathway tiki torches offer a unique and rustic approach to outdoor lighting, combining the old-world charm of torches with the durability of stone or metal bases. These torches can be strategically placed along pathways, providing a warm and flickering glow that enhances the visual appeal and ambiance of outdoor spaces. Ideal for garden paths and backyard settings, tiki torches create a welcoming and festive atmosphere perfect for entertaining guests or enjoying a quiet evening outdoors.
How to Achieve It
Planning:
– Determine the number of torches required based on your pathway’s length and lighting needs.
– Select locations along the pathway where torches will have maximal impact without obstructing movement.
Selection:
– Choose torches with metal or stone bases for stability and durability.
– Opt for models designed for consistent flame and equipped with spill-proof features.
Installation:
– Secure each torch firmly into the ground or into pre-installed mounting brackets for stability.
– Ensure torches are positioned safely away from flammable materials and sheltered from strong winds.
– Fill torches with torch fuel, following safety and usage instructions provided by the manufacturer.
Color Scheme:
– Select torches with natural finishes like bronze, copper, or stone to seamlessly integrate with garden elements.
– Use torches that produce warm yellow flames to maintain a cozy and inviting atmosphere.
“`